
Recently I had to use a vacation day to take my car to the dealer a recalled airbag. Quite possibly the least exciting use of a vacation day ever. But there was a Restore next to the dealership and I had been keeping my eye out for a new kitchen table for my mother-in-law. She wanted to replace her pink tile top table so that she could paint her kitchen a different color. So I decided to kill time and I found this not so lovely table for $35!
The table had years of wear, many coats of polyurethane, and a ton of scratches, but I figured for $35, I would take a chance on it.
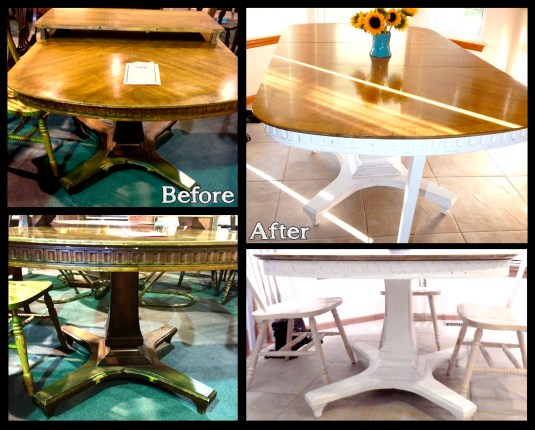
It was my first project using a chemical stripper and stain and I learned a lot pretty quickly. Read the full post below to see the steps I took and how it turned out.
Bottoms Up
I decided to paint the bottom white and sand some parts off so it had a “distressed” look, so I just sanded and painted with homemade chalk paint, which was pretty easy. I tried to use glaze on the white base and it just made it look dirty. I ended up repainting every area I glazed because I hated it so much. Not a fan of glaze. I don’t think I’ll try that again!
I then lightly sanded around the edges of the base and the pattern of the edge of the table to make it look a little worn and loved and sealed with polyacrylic.
My in-laws have a furniture set with a white distressed bottom and a worn wood look on top that they recently bought so I was trying to match that look for them. I think it came out pretty close!
Top it Off
The top of the table had an interesting pattern in the wood grain that I wanted to preserve, but I wanted to stain it little lighter than the original color. I tried sanding the whole top and realized it was going to take forever, so I decided to get over my fear of chemicals and try a stripper.
Tips to Strip
I bought a can of stripper, (I think it was goof off), thick chemical gloves, a plastic scraper meant for stripping (the other ones melt from the stripper), a vapor mask, and goggles. I also bought a pint-sized metal paint can to pour a small amount of stripper into so that I could dip a paint brush in without splashing.
That stuff is strong! I accidentally spilled a drop on my arm and felt like the tiny drop was eating entire my arm off. I washed it off right away and it left a red dot on my arm for a week. I also wouldn’t let Rylee anywhere near the patio for a week after because I was afraid she would lick somewhere that a drop had spilled.
The stripper directions said to leave it on for 15 minutes and then scrape off. I was using it on a 90-degree day and found I had to start scrapping after 8-10 minutes or it would dry out and wouldn’t come off. You have to scrape when it’s still wet or it won’t work. I learned that the hard way. I originally thought leaving it on longer would make it melt more and be easier to remove. Nope! It’s best when it’s like a gel-ish consistency. It was really easy to use for the most part. The can said so use in 3-foot sections and not to do a large area at once. I didn’t listen and tried a bigger section, which also lead to it drying out too quickly and me having to go over the same section a few times. I would definitely use it again if I wanted to stain something. Much easier than sanding the poly off. Just follow all the directions and check to see when it’s starting to dry out.
I then sanded with the power sander and went over it by hand with some sandpaper to make sure it was smooth.
All Stain No Pain (well, mostly)
I tried a few stain samples on the underside or the table leaf and ended up going with Weather Oak – it had a touch of gray to it that was exactly what I wanted. The first time I stained the top, I left it on for too long and did too many coats and it came out a little darker than I wanted. So I ended up sanding it down – which was easy since it just had a few coats of stain that hadn’t really penetrated the wood too much. Before I applied a new stain, I used the pre-wood conditioner, which did seem to make a big difference in the absorption for the second stain.
When it was done, I used 4 or 5 coats of poly on top since I knew it was going to get some heavy usage. The directions said to go in the direction of the wood grain, which was difficult since my piece had diagonals. I should have gone all one way but decided to try to match the angle pattern with the poly, which just left it uneven in the middle. I didn’t realize it until it was done but I wasn’t stripping and sanding it down again and it is not that noticeable.
I read a lot of the guides on the Minwax website. It was pretty useful with tips like this- “Not sure what type of finish is on your wood? Take the Cotton Ball Test to find out. Touch the finish in an inconspicuous place with a cotton ball dampened with acetone nail polish remover. If the cotton ball sticks or the finish softens, it’s varnish, lacquer or shellac. If there is no effect, it is paint or polyurethane.” – That helped me figure out what kind of stripper to get.
In progress pictures with captions explaining are below. Sorry about the photo quality! I was having some lighting issues with my camera. It looks much better in person.


